Quick Chat: Keepalived
Howdy Peeps! Time for another Quick Chat! This time I wanna give a real quick attention burst over to Keepalived. So for those of you that are familiar with VRRP from our previous quick chat on it you are mainly familiar with implementing VRRP on VyOS firewalls. Now what if you wanted to have a virtual ip between two different servers, and you didn’t want to have to set it up through a firewall? That’s where our pal Keepalived comes in!
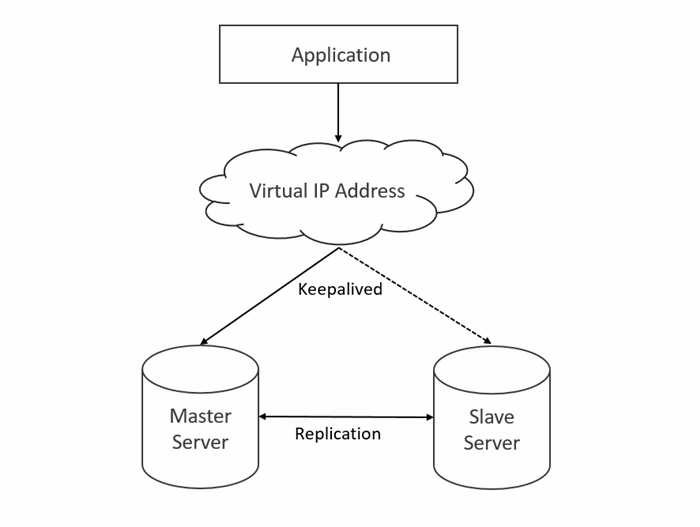
What Is Keepalived?
- Keepalived is a routing software that provides simple and robust abilities for loadbalancing and high-availability to Linux boxes. The Keepalived loadbalancing framework relies on the Linux Virtual Server (a.k.a IPVS). It work by implemeting checkers to dynamically adapt to maintain and manage loadbalanced servers based on their health. The high-availability is thanks to our bud the VRRP protocol shoutout to RFC 5798, lol. As I said in a previous Quick Chat, VRRP is a primary foundation for router failover. It integrates with Keepalived using a set of hooks to the VRRP finite state machine, giving low-level and high-speed protocol usage. Overall it’s pretty cool. Just careful you don’t fry your brain in the RFC rabbit holes that one can tend to jump in. So let’s get jiggy with it!
How To Install Keepalived? (I’m using Ubuntu 18.04/Bionic Beaver 🙂)
sudo apt-get install keepalived- LOL Yup. It’s that eazy.
- Now that we have keepalived installed we gotta set it up. Don’t worry it won’t get hard from here. The most lifting you will have to do is creating the config file 😛
How To Set Up Keepalived?
nano /etc/sysctl.conf- insert the following line at the end of the file:
net.ipv4.ip_nonlocal_bind=1This allows a running load balancer instance to bind to an IP that is not local for failover. If you’ve noticed a trend in my posts I’ve got a couple HA Proxy boxes running which is why I added that line.
- insert the following line at the end of the file:
- Next
cd /etc/keepalived/ nano keepalived.conf- Now you’ll prolly have an empty file or there wasn’t a file there to begin with. No probz, let’s remedy such situation by creating the config.
- There’s multiple ways you can do this. Most peeps usually just curl.
- Me, personally I hand typed the config because I’m three fries short of a happy meal wacko 😛 shoutout to SG1!
- Afterwards tho I tossed it up to my GitHub page and then just curled it down to the rest of the boxes I needed it for, (obviously making changes as needed locally).
- Take a gander at the config here or below it’s short
- For the most part I didn’t want to be extra in my config. There’s sections you can add to make keepalived send you an email whenever something fails over, etc. But I mainly just wanted keepalived for the VRRP application. So that’s why my config is bare bones for VRRP. I’ve also pasted it below
vrrp_script  chk_haproxy {
     script "killall -0 haproxy" #checks if haproxy is still alive
     interval 2 #check every 2 secs
     weight 2 # add 2 points if priority is ok
}

vrrp_instance VI_1 {
     interface ens160 #what's your network interface?
     state MASTER # or "BACKUP" on backup
     priority 101 # or 100 on backup
     virtual_router_id 51

     virtual_ipaddress {
          10.0.4.6 #this is the VIP to be used
     }

     track_script {
         chk_haproxy #refer to top
     }
}
-
Once the config is setup with all your needs. Simply start er up!
sudo systemctl enable keepalivedsudo systemctl start keepalived- For troubleshooting keepalived works with syslog, so:
cd /var/log- go to syslog and tail those logs to see error messages.
- Now that keepalived is up and running you can use the Virtual IP address to refer to your two servers. For me and in this example if my master HAProxy server goes out/fails/dies, Keepalived will allow the backup HAProxy server to take over because from the outside the Virtual IP address is being used.
And that’s a wrap! We got load-balancing and redundancy!!